Due to my studies and social life I have left this blog idle for a while, however all that is about to change as I embrace the multi-media opportunities of this blog format. I have made a video of me making my favourite bread of all, pizza. Hopefully this will add some sense and techniques to the rather sparse recipe available for download and become a regular fixture of this site.
My next post, which I am working on as we speak, will be the most simple to make bread imaginable. This will be to encourage all those non-bakers who have been logging on recently to get out there and bake, so watch this space. I also hope to provide baking video tutorials on kneading, shaping and the all important overnight technique.
Till then, be a baker.
Monday, 13 October 2008
Monday, 9 June 2008
Cycling Fuel
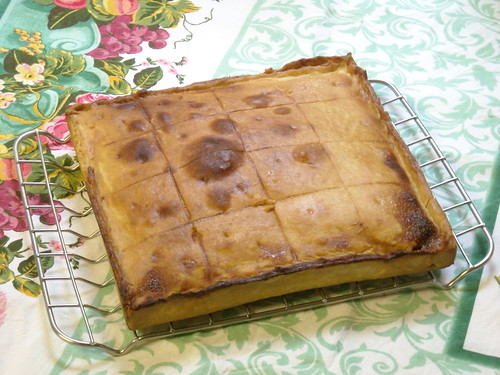 Today's recipe is another dessert which I justify the sugar content of by doing over 100km on my bike on a Sunday morning. I really enjoy my cycling and to do it you need a good amount of carbohydrate in reserve so something such as these Butterscotch Squares is just the thing to keep the legs turning (it doesn't travel well though, so I have to load up beforehand).
The recipe is another one of those passed down to me by my mother and, probably, from her mother before that. I may have already mentioned that I come from good baking stock, so there are a number of these recipes that I really associate with my childhood and which are, to me, quintessentially English.
This one refers again to shortcrust pastry, the simplest of pastries and something I have posted on before. Though if you are still too worried/lazy to make it yourself it is available ready-made in most supermarkets. The key to getting a quality product with this recipe is to make sure the egg is well beaten in and to put plenty of holes in the top to stop the air getting trapped inside and lifting the pastry off the filling (something I didn't manage on this occasion as I added the glaze after the holes; schoolboy error). Despite this it is a quick and easy recipe, one to do if the oven is already on for some bread, as I did, and will still taste great even if the pastry is a little crumbly, puffy or soggy. Make sure you grease a square tin well to make it easy to get out afterwards. It is obviously not imperative to use a square tin, though with 'squares' in the name it does ask for it, chuck it into whatever receptacle you have to hand that can withstand 200C and has a similar area.
Till next time: keep up the baking, keep it traditional and try something new (to you).
Thursday, 5 June 2008
Simply the best?
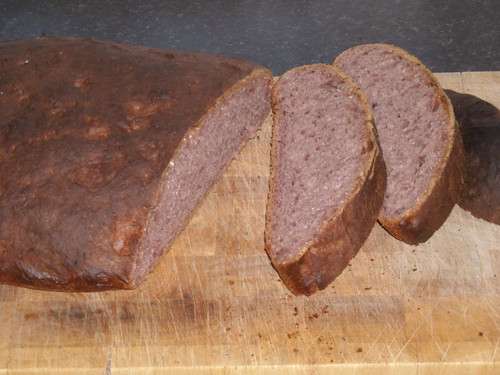 You may have noticed that I am steadily catching up with the backlog of recipes I have accumulated over the past few months. This time it is the turn of an idea I had some time ago, but which has taken a while to put into practice (and some experimentation).
I always like to think of new flavours to add to my bread; I often use my simple bread recipe so adding seeds, herbs and other flavourings stops it from becoming dull. The addition of wine to bread is not a new concept, but with my favourite being red wine I wanted to see if I could get that flavour, and colour, into my baking. There are problems with adding wine to bread, the principal one being that high concentrations of alcohol can have an inhibitory effect on the yeast, slowing or even stoping the rising. After a few experiments watering down the wine I realised that this was reducing the flavour and colour too much to be useful, so I came up with another plan.
I reduced an entire bottle of red wine down to about a third of its original volume by heating it slowly on the stove in a large pan. The first time I did this I busied myself elsewhere in the house while it was going on (watched TV), but the second time I had lots of washing up to do so I shared the kitchen with the wine. Bad idea. The fumes coming off the pan got me not-nice-drunk and gave me a nasty little headache into the bargain. I suggest if you try this that you do it in a well ventilated area.
With my super-concentrated and alcohol-free wine I then proceeded to make a loaf of bread that my wife described as, 'possibly the best bread I have ever tasted.' She doesn't shirk telling me when she thinks I have not succeeded in my plans, so this is praise indeed. The taste is reminiscent of both red wine and the flavour of burnt crust, and pervades the entire loaf. I shall definately be making it again, if only because it is a good way to get rid of that bottle that someone bought you, but you haven't had the courage to drink.
As always the recipe is available in an easy to use single page pdf, so give it a go if the idea intrigues you. Even better, try ideas of your own and see what happens.
I made it out of my own head.
Tuesday, 3 June 2008
Piece of Cake: How to Cheat at Baking
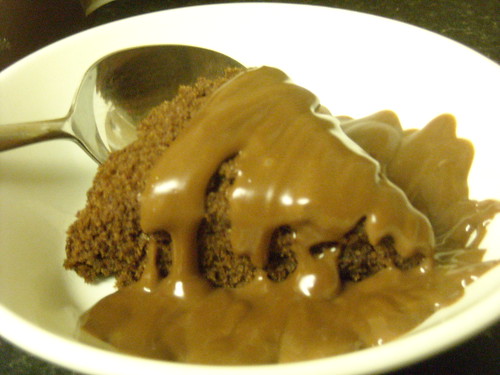 So you've had a few people over for dinner and you haven't made a pudding. It would normally take at least half an hour to make a chocolate sponge, but I have managed to get it down to less than 16mins and make a party piece out of the process.
Some may say that this isn't really baking, to them I say, 'move with the times.' Using a microwave, the main time saving device in this recipe, is no different than using a modern oven would be to traditional bakers of the past.
This recipe incorporates a simple chocolate sauce because one of the disadvantages of this technique is that the cake can be a little dry. The other disadvantage (or you could look at it as an advantage, depending on your point of view) is that it doesn't keep at all and will need to be eaten immediately after 'baking'. Don't worry, get this out at the tea table and there will not be any left for the birds, I assure you.
So if you thought that baking was a long and complicated process try this one, I challenge you to do a sub 16min cake!
Brevity in baking.
Friday, 30 May 2008
From a time before diets...
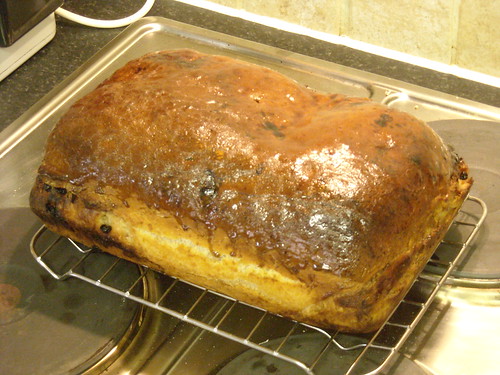 My mother's production of this cake for a family party last week reminded me that I had not posted the recipe since I made it myself a month or so ago, and of its popularity (it all went in less than 20 mins).
You can make no bones about the serious health implications of eating this delicious treat, the name gives the game away: Lardy Cake. As the recipe shows it really does contain a lot of lard and, as this is saturated fat and not something the doctor would suggest you eat a lot of, it is not going to do anything for your waistline. There is also a considerable amount of sugar in there, your dentist would probably rub his hands together with glee at the sight of warm syrup being spread over the top in spoonfuls, but it is not a Lardy Cake without it.
Why am I telling you all this? Because we all know that the nicer something is the less healthy and generally good for you it is going to be, and this is the perfect example. The preceeding warnings only confirm that this cake is going to taste delicious and that it should be a regular, though not frequent, addition to your baking (take note health warning writers, there is a difference between these two concepts!).
The rolling and folding does take some getting used to, it's similar to puff pastry, so I've added some pictures below to give you an idea of the sequence. The main things are to make sure the rolling is even and the edges are sealed properly to trap the air; that way it will rise happily and evenly when baking.
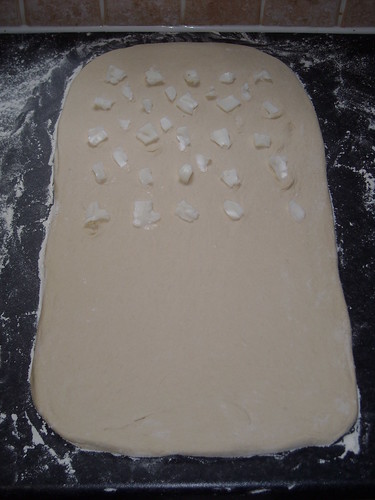


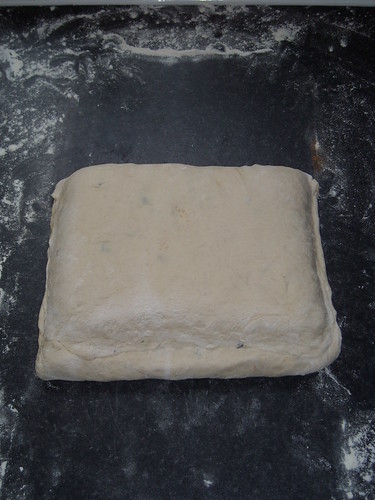
Don't eat it all at once.
Monday, 3 March 2008
Cheese scones and illness (not related).
I have got a bit behind in my blogging of baked goods, partly due to a recent spate of illness. This has pushed me to turn this more into a resource for baking than a diary of my baking activity. To this end I shall continue to post recipes as and when I have photos to go with them, but the chronology may be a little off.
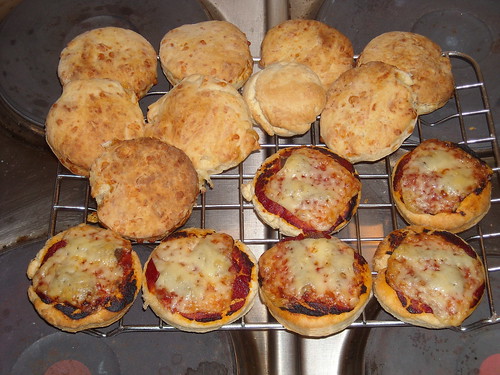
This recipe is for cheese scones, a great addition to any Sunday tea and a favourite of mine. I made these a couple of weeks ago as a quick snack, because as they use self-raising flour they do not need rising time; just chuck them in the oven. In fact a friend said to me the other day that her mother went by the adage of 10mins to make - 10mins to bake, but I think I would probably change that to 15 mins for each as I like mine crunchy on the top. The same recipe can be used to make 'cobblers' to go on top of oven baked stews (contact me via the comments if you'd like a recipe), the cheese substituted for dried fruit and a bit of sugar for fruit scones, or all of that left out for plain scones. But these are the best.
Leftover bits of trimmings when rolling and cutting the circles can be kneaded together, rolled and re-cut, but I like to leave them as crescents and bake them on a separate tray. They only take about five minutes because they are smaller and make a lovely hors d'oeuvre, alternatively, as in the picture, mini pizzas can be made by adding tomato puree and cheese (or any topping you like) for a great party finger food.
Another note is, if it is to your taste, to use the strongest hard cheese you can find. Cheddar is nice, especially a good mature one, but I have had excellent results with parmesan too; though the cost here could be prohibitive.
I'll be back with more recipes and pics soon (including one that, though traditional, is guaranteed to clog the arteries at the same time as it tickles your taste buds!).
Till then, bring on the baking.
Wednesday, 20 February 2008
Sticky, sticky goodness
 I'm getting a bit lame at posting things as soon as I do them and this one has taken almost a week to reach the online community. Apologies, I shall try and get my work/personal life priorities realigned.
So this was last weds/thurs creation (the overnight technique strikes again) and is a well known English favourite, Chelsea Buns. For those of you who haven't had the pleasure of sampling their delights it is basically a sweet yeasted bread containing currants and spices and covered all over with a sticky sugar glaze; it should look something like this:
During the preparation it is important to space them apart enough to allow for rising, but not so far that they don't join together when they have risen sufficiently. There are some extra pics below to illustrate this. The glaze is also a very important element to this recipe, although they taste good without it (and might be better for those watching their waistlines), they are a little dry and the glaze really makes them sweet and special. Make it using two tablespoons of Golden Syrup to one large teaspoon treacle (molasses to our American cousins), and heat that in a mug in a microwave or pan on the hob to make it nice and runny so it mixes together and brushes over the hot buns easily.


This recipe makes twelve buns, which is a bit much for just two people as they don't keep particularly well, so either decrease the measures and the dish they go in or, as I did, take the rest to work and be your colleagues' favourite person for a day.
Stick that in your lunch box and munch it.
Monday, 11 February 2008
A Well Baked Dessert
 After a week of the 'Old Favourite' and raiding the stocks in my freezer, Sunday dinner brought the opportunity for baking another dessert that ranks high amongst the classics of English baking. Bakewell Tart is a delicious almond flavoured pudding that always goes down well with family and guests alike, and this one was no exception. Having a slightly larger topping than is traditionally used, and never skimping on the jam filling, makes it something special to finish off a meal with. Its quick preparation also means it is possible to prepare it as the rest of the dinner is cooking away, and it can always be left in the fridge for a few minutes until the oven is ready. The base is a simple shortcrust pastry, which I have covered here before, so there really is no excuse for not making the entire thing from scratch (even I buy the strawberry jam though!).
Over the course of the weekend I also made a couple of focacce (Italian plural of focaccia, in case you're wondering) and also some chocolate orange cup cakes for a birthday party I was attending; these are simply the usual sponge mix divided into baking cases and baked at the same temperature, but for just 10-15mins.
So although there has not been a lot of note over the last week, I'm sure you'll all be glad to hear that I continue to bake on a regular basis.
Go thou and do likewise.
Monday, 4 February 2008
Sunday's Baking
 Sunday, while the oven is on for the roast dinner, is another day that finds me flouring the kitchen and baking up a storm. This week I wanted to try something new (and use up a few olives left over from the pizza evening on Saturday) so I attempted an olive bread. This bread is based on a 2:3 ratio of water to flour, flavoured with olives added before proving. It is useful to get used to this method of gauging loaves of bread, as the ratio of flour and water has a big effect on consistency and will allow the expert to recreate breads sampled elsewhere. It will be advantageous if you have seen the post where I formed a bloomer to get an idea of how to shape this bread, and it is slightly unusual in that it is slashed before proving rather than baking, giving you the opportunity to fill those slashes with olive oil and make a crisp and golden crust when brushing prior to baking. The photo was taken by my wife and the loaf is cut because I only remembered we needed a photo when we were already sat down for tea!
 No Sunday tea is complete without a nice slice of cake, and it is a sticky-topped chocolate cake I chose to make on this occasion. This is similar to the ginger cake mentioned earlier, using the same technique, but with cocoa instead of ginger for the flavouring. This one also benefited from the vanilla essence I brought back from Zanzibar, the like of which I have never tasted before.
I hope this tickles your fancy and encourages you to get up from the computer and bake either something new or something sweet, it was this blog that encouraged me to do something out of the ordinary this weekend, having baked my standard breads all week (not worth posting again) and going without cake (a crime).
Bye-bye bakers.
Friday, 25 January 2008
The Advantages of Blogging
Writing this blog encourages me to bake much more interesting things than I would usually do. I get stuck making the same few things, but as that would get pretty boring on here I have to find new things (or resurrect old things) in order to be able to continue posting.
It also makes me think about my baking, the other day I posted on Shoo-Fly Pie and, though I have been interested in its origins for some time, I have never looked into it in any depth. My research yesterday, prompted by my post, told me that it is a popular dish amongst the Dutch immigrants in Pennsylvania, USA. There they use molasses (treacle to us Brits), which I think would be a little gooey and strong for my taste. If, however, you would like to try this method then a recipe should be able to be found here.
So, though you may think that this site is purely for the thousands of bakers out there who are looking for inspiration, it is really all for my personal benefit and development as a baker (none of them have managed to find it yet anyway!).
Stay free.
Wednesday, 23 January 2008
Shoo-Fly Pie
 I haven't been baking a lot of puddings recently, just a few cakes every now and then, so my blog has been a bit devoid of sweet treats. This is starting to be remedied with my latest offering, and we are dipping our toes into the world of pastry at the same time.
Shoo-Fly Pie is perhaps my favourite non-chocolate pudding and this recipe has been passed down through my family for some generations. It is a cross between a pie and a crumble, with a dried fruit filing squeezed between a pastry base and a crumble topping. To make it you will first need to have some shortcrust pastry, perhaps the simplest form of pastry, which you can either buy or, as you have lots of flour in your house and it only takes a minute, just follow my simple instructions.
Both these recipes use the 'rubbing in' technique, where the fats and flours are usually rubbed together using fingertips. If, like me, you don't like this method because it gets under the nails, the fats melt from your warm hands or it's just a pain and strain on the fingers, then you can work the two together with a fork (or even in a food processor) which is much easier. It may take some time for you to get used to the quantity of water needed to make a good pastry, but you can't go far wrong, adding flour or water as necessary to make a workable consistency will always provide a perfectly edible pastry. I use self-raising flour because I think it is slightly more forgiving and makes a lighter pastry than the plain variety, but either is acceptable. Leaving it for a few minutes in the fridge always improves it's performance, especially after lining trays, and prevents it shrinking too much during baking.
Once you've got the pastry everything is reasonably straightforward and according to the recipe, my most common error is forgetting to add the spices to the dry flour, which makes it difficult to mix them in later. I'm sure you will not be disappointed with the results, it always goes down well with visitors to my house, many of whom have never heard of/tasted it before.
Sweet.
Tuesday, 22 January 2008
Trouble Shooting
As promised, and despite not receiving any questions on problems, I have decided to post a troubleshooting section as part of my 'associated ramblings'. Today I made my usual baps, so there isn't any point posting about those again, but these have taken some time to perfect, especially the overnight technique, which suffered from large air spaces in the rolls for a time. This was most probably caused by over rising on the first rise, as decreasing the amount of yeast I use over time seems to have sorted the problem (I now use less than half of what I started with).
This could also be associated with a problem that plagued my focaccia for a time. Here I found that the crust would often detach from the body of the bread in baking, making a loaf that looked like it had risen incredibly, but which just had a big airspace in the middle. I think this was caused by drying out of the dough during rising as I wasn't keeping it as well covered as I should have done. This is especially a problem with overnight rising as it is over a longer period of time, so covering with oiled cling film at all times is a must. Oiled film serves two purposes, it stops the film sticking to the dough, but it also creates a more perfect seal around the container that the dough is in; further preventing drying out.
Other problems are generally associated with over or under baking or proportions of ingredients and can be resolved with a little experimentation. Longer baking times produce a harder and thicker crust; shorter a softer crust. More water can make the dough difficult to work with, but also provides a looser texture to the crumb and a softer consistency (milk is good for softening the crumb too).
The longer the rising time the better in most cases. To this end amounts of yeast should be adjusted to the conditions normally found in your house to produce a rising speed that is appropriate to your schedule and, secondly, the bread type (more yeast, quicker rising, obviously). It is never going to make a bread that is inedible (unless you really put a lot in), so make the yeast work for you.
Well I hope that has covered a few of the most common problems/complaints, if you have any more then this is probably the place to leave them and I shall endeavour to resolve them.
Back to business.
Monday, 21 January 2008
Soda Bread
 Today, in deference to my wife as I don't like it very much, I made soda bread, which is a bread made without yeast and using bicarbonate as the raising agent. Its advantage is that it is relatively quick to make, though it takes a while to cool, so it can be made in the morning without any activity the evening before (I watched a film that finished late last night).
The main thing to note with this bread is to be really gentle with the dough; you don't want to excite the gluten in the flour too much or it will end up as a very solid lump. Also try adding extra bicarb or cream of tartar and varying the liquid to achieve the consistency that you like.
The 'bonnet' mentioned in the recipe can be any metal or other ovenproof material, it does make a difference. By keeping the dough moist whilst the rising takes place, it gives it more room to breathe as it were.
You may like this bread more than me, it's a bit stodgy for my taste, if so you have an easy job bread making. If not I'm sure you will find a recipe to your taste elsewhere on the site.
Bake boldly.
Saturday, 19 January 2008
Saturday Baking
 Saturday is a busy time in the kitchen, mainly because once the oven is on I have time to throw a few other things in too. Today I made a simple roll (these simple breads just keep on coming) based on pizza dough and popular in Italian bakeries on Saturdays due to their good shelf-life; they'll still taste fresh on Sundays when the bakeries are closed. For this reason, and because I made up the recipe myself before my wife informed me of this fact, I shall call it Saturday Bread and shall not provide an overnight recipe; you can adapt it yourself if necessary. To make the knotted rolls when shaping the dough, just roll out a piece of dough into a sausage shape about 30cm long and tie into a knot, as it proves it will fill out into a roll.
While I had the oven on I thought I would also do a simple vanilla sponge cake, especially as I had brought some vanilla essence back from Zanzibar the like of which I had never smelt before. As it turned out I could have used a little more vanilla, but filled with strawberry jam the cake itself was nice enough.
 This evening I also provided pizzas for a few friends. I have included a photo here due to popular demand (Frutti di Mare, or seafood to you and me) and I shall also provide a link to the recipe as I have finally managed to write one rather than just keeping it in my head. Notes on the details of cooking and handling pizza can be found here.
So a busy day in the kitchen for the baker, but the products were well worth the small amount of effort involved!
Bake big.
Friday, 18 January 2008
Pitta Bread
 If you thought that the previous recipe was easy then this one is going to be simple for you. Pitta bread is a popular staple in sandwiches and snacks, but the shop bought varieties are a poor reflection of home-baked pitta, made more to last than for their taste or texture.
This pitta bread recipe is probably Greek in origin as many flat breads such as these are made without yeast in north African countries and the Middle East. As usual I have slightly adapted the recipe to also be suitable for overnight baking, but by now seasoned readers should be getting the hang of slowing the rising to make bread baking fit your schedule; after all we're much more intelligent than the yeast. I prefer to make mine using the half and half wholemeal/white method, but they are just as good when made with only strong white flour (I shall write a post about flour types in the near future).
The main point to note when making this bread is that it is really important to have the oven and the trays hot before baking. In order to get the breads to split properly and puff up during cooking they need a sudden and extreme rise in temperature to create steam pressure within the bread (watching them as they bake is quite entertaining).
Once made the breads can be used to make delicious sandwiches, and any leftovers can be toasted and cut into strips for dipping in old favourites such as hummus or guacamole.
Be better bread.
Wednesday, 16 January 2008
The easiest bread in the world
So, being a little on the lazy side after so many days away, I made my simple bread by the overnight recipe today and formed it into baps. The photo these produced has been added to the original post at the link above so you can get an idea of how mine turned out. They were delicious with some boiled egg from my chickens (it came out normally, I boiled it) and also with ham and mustard. The remainder was immediately frozen as per my previous instructions so I can be even lazier another day.
Bake well.
Bake well.
Tuesday, 15 January 2008
Crusty Bread
Today I baked my natural leaven bread, which comes out with a deliciously crispy crust. I dutifully photographed it and added the photo to the original post as linked to above. This bread is excellent with soft cheese like brie or camembert, and the leaven has kept perfectly well in the fridge while I was away on holiday.
Keep baking.
Keep baking.
Monday, 14 January 2008
Where have I been?

The dearth of posts in recent weeks has been as a result of the hectic run-up to Christmas and a holiday I took to relax after a busy year. I have spent the last two weeks in Zanzibar soaking up the sun and trying to forget how cold it was in England (this is me silhouetted against the pure white sands of the east coast, paradise).
Unfortunately all this galavanting around the globe left me with little time to bake bread and no access to the internet for blogging (as if I even thought of it!), but on my return I am straight back into the fray, and the new Nikon Coolpix L15 will provide some beautiful shots of the baking process to help you along. I haven't decided whether to re-post or just bake, photo and go back to the original posts to add them; this might be better for new arrivals to the blog.
So the first thing I baked back in Blighty was based on the baps recipe I posted previously as a simple bread, but this time I formed it into a bloomer by taking it after the first rising and forming a round, folding in the 'corners' to hold the loaf together and then rolling up and coating with sesame seeds for a nutty flavour (leave the seam-side down).


Slashing the top just before baking allows more rising as the crust doesn't restrict its movement; make the slashes with a very sharp knife (preferably razor blade) and in one quick movement across the bread, really quick, otherwise it just gets caught up in the dough.


Subscribe to:
Comments (Atom)